Eine Maschine für ASP.NET (oder generell den Web-Stack von Microsoft) und Web Deploy vorzubereiten ist nicht wirklich schwierig.
Wer die Server-Variante einsetzt kann das ganze sogar via Powershell erledigen – dazu einfach bis fast ans Ende des Posts scrollen.
Kurz-Information: Was ist Web Deploy?
Web Deploy (früher auch MSDeploy genannt) ist eine Deployment-Art welche cleverer als XCopy oder FTP ist. Ein kleinen Einstieg hab ich damals in diesem Post gegeben.
Setup über die GUI (Windows 8 und Windows Server 2012)
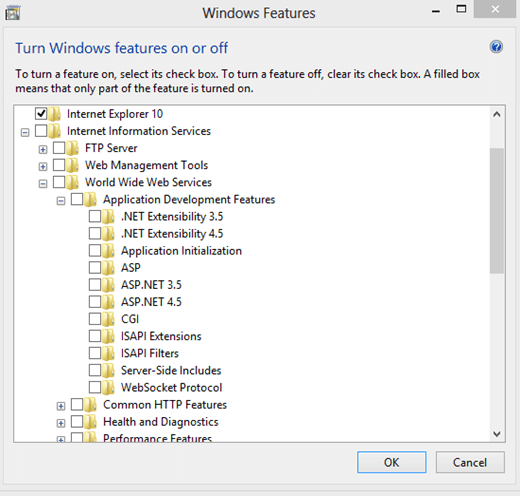
Ein relativ nacktes Windows 8 System hat als Windows Features nur das Nötigste dabei:
Das heisst erstmal die Grundsachen installieren: IIS & co.
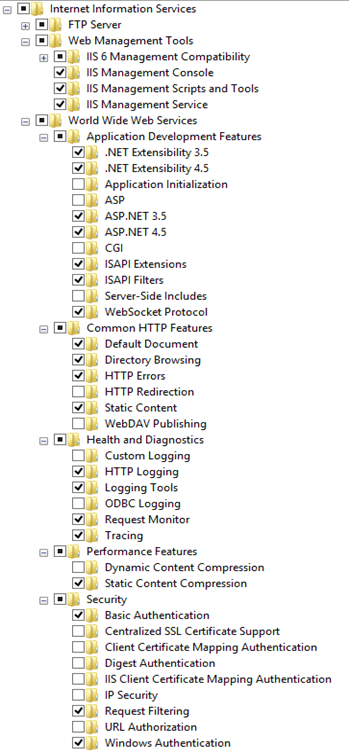
Am einfachsten den Haken bei “ASP.NET 4.5” reinsetzen und dazu wähle ich noch die Management Tools aus sowie zwei, drei andere Sachen – WebSockets, Windows Authentifizierung, Logging z.B.:
MSDeploy über den Web Platform Installer installieren
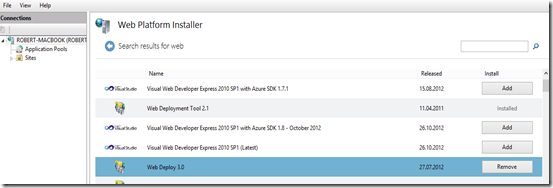
Wenn man nun den IIS Manager öffnet springt einem sofort der Web Platform Installer entgegen. Über diesen lässt sich WebDeploy (manchmal auf MSDeploy genannt) und andere Tools nachinstallieren.
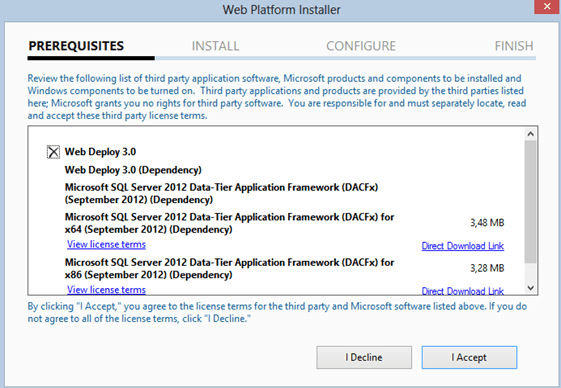
Gebraucht wird Web Deploy 3.0
Fertig.
Hinter den Kulissen von Web Deploy: MsDepSrv & WmSrv
Es gibt zwei Dienste, welche den Web Deploy Aufruf entgegen nehmen können:
Der IIS Management Service (wmsrv) und der MSDeploy Service (MsDepSrv). Der einzige Unterschied ist, dass man auf einem Server Betriebssystem IIS User erstellen kann und dass das Deployment auch von nicht-Admins über diese Accounts ausgeführt werden kann.
Dieser Dienst ist auf einer Windows Client Version (= Windows 8, Windows 7 etc.) nicht verfügbar! Allerdings funktioniert Web Deploy dann über den MsDepSrv.
Setup via Powershell auf Windows Server
Auf diesem Blog habe ich ein extrem praktisches Powershell Script gefunden – allerdings funktioniert dies nur auf Server Betriebssystemen, da der “Server-Manager” auf Windows Client Installationen nicht vorhanden ist. Eine genaue Erklärung ist direkt im Blog enthalten. Das Script gibt es auf GitHub, oder direkt hier.
Es installiert im Grunde den IIS und diverse Features nach und lädt dann über die Web Platform Installer Command Line das Web Deploy 3.0 Paket herunter und installiert dies zusammen mit anderen Packages – kann man beruhigt zuschauen ;)
##################################################
# Resources:
## ServerManager Module: http://technet.microsoft.com/en-us/library/cc732263.aspx
## NetSecurity Module: http://technet.microsoft.com/en-us/library/hh831755.aspx
## Others:
## http://www.iis.net/learn/manage/remote-administration/remote-administration-for-iis-manager
## http://blogs.technet.com/b/heyscriptingguy/archive/2012/05/12/weekend-scripter-use-powershell-to-easily-modify-registry-property-values.aspx
## http://www.iis.net/learn/install/web-platform-installer/web-platform-installer-v4-command-line-webpicmdexe-rtw-release
## http://www.tugberkugurlu.com/archive/script-out-everything-initialize-your-windows-azure-vm-for-your-web-server-with-iis-web-deploy-and-other-stuff
##
## Instructions:
## When you install the Web Platform Installer v4 RTW
## (http://download.microsoft.com/download/7/0/4/704CEB4C-9F42-4962-A2B0-5C84B0682C7A/WebPlatformInstaller_amd64_en-US.msi),
## you will get Web Platform Installer v4 Command Line Tool OOB. Under C:\Program Files\Microsoft\Web Platform Installer directory,
## There are three files:
##     * Microsoft.Web.PlatformInstaller.dll
##     * WebpiCmd.exe
##     * WebpiCmd.exe.config
## These files can be copied around. Take those three files and put this script under the same path.
## Set your PowerShell Execution Policy to Unrestricted:
##     PS> Set-ExecutionPolicy Unrestricted
## Lastly, run this script file:
##     PS> .\Init-WebServerVM.ps1
## Now, go and watch your favorite TV Show till your VM gets ready for ya :)
##################################################

# Variables
$ScriptRoot = (Split-Path -parent $MyInvocation.MyCommand.Definition)
$additionalFeatures = @('Web-Mgmt-Service', 'Web-Asp-Net45', 'Web-Dyn-Compression', 'Web-Scripting-Tools')
$webPiProducts = @('WDeployPS', 'UrlRewrite2')

# Import Modules
Import-Module -Name ServerManager
Import-Module -Name NetSecurity
Import-Module -Name Microsoft.PowerShell.Management

# Add Windows Features
Install-WindowsFeature -Name Web-Server -IncludeManagementTools -LogPath "$env:TEMP\init-webservervm_webserver_install_log_$((get-date).ToString("yyyyMMddHHmmss")).txt"
foreach($feature in $additionalFeatures) {

    if(!(Get-WindowsFeature | where { $_.Name -eq $feature }).Installed) {

        Install-WindowsFeature -Name $feature -LogPath "$env:TEMP\init-webservervm_feature_$($feature)_install_log_$((get-date).ToString("yyyyMMddHHmmss")).txt"
    }
}

# Make Sure That Remote Connection is Enabled
if((Get-ItemProperty -Path HKLM:\SOFTWARE\Microsoft\WebManagement\Server\ -Name EnableRemoteManagement).EnableRemoteManagement -eq 0) {
    Set-ItemProperty -Path HKLM:\SOFTWARE\Microsoft\WebManagement\Server\ -Name EnableRemoteManagement -Value 1
}

# Set WMSvc to Automatic Startup
Set-Service -Name WMSvc -StartupType Automatic

# Check If WMSvc (Web Management Service) is running
if((Get-Service WMSvc).Status -ne 'Running') {
    Start-Service WMSvc
}

# Install WebPI Products
& "$ScriptRoot\WebPICMD.exe" /Install /Products:"$($webPiProducts -join ',')" /AcceptEULA /Log:"$env:TEMP\webpi_products_install_log_$((get-date).ToString("yyyyMMddHHmmss")).txt"

# Add WMSvc Port Firewall Allow Rule
New-NetFirewallRule -DisplayName "Allow Web Management Service In" -Direction Inbound -LocalPort 8172 -Protocol TCP -Action Allow

# Restart the Web Management Service
Restart-Service WMSvc
Ansonsten behält mein älterer Post weiterhin seine Gültigkeit.
Web Deploy anwenden
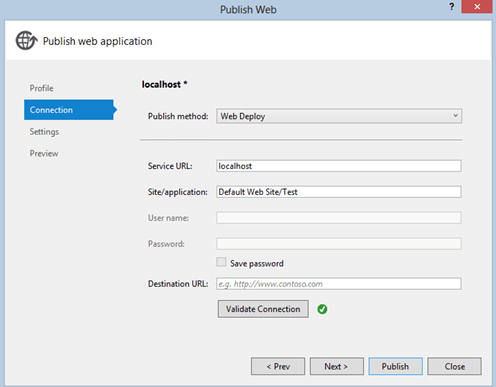
Nach der Installation (z.B. auf unsere lokale Maschine) können wir Web Deploy einfach nutzen indem wir im Visual Studio Projekt ein Publishing Profil hinzufügen:
Ergebnis:
:)
Damit sollte man nun für den ersten Einstieg in die Welt von Web Deploy und dem IIS gerüstet sein.
