The CRA Problem
In my previous post I showed a simple setup with ASP.NET Core & React. The React part was created with the “CRA”-Tooling, which is kind of problematic. The “new” state of the art React tooling seems to be vite.js - so let’s take a look how to use this.

Step for Step
Step 1: Create a “normal” ASP.NET Core project
(I like the ASP.NET Core MVC template, but feel free to use something else - same as in the other blogpost)

Step 2: Install vite.js and init the template
Now move to the root directory of your project with a shell and execute this:
npm create vite@latest clientapp -- --template react-ts
This will install the latest & greatest vitejs based react app in a folder called clientapp with the react-ts template (React with Typescript). Vite itself isn’t focused on React and supports many different frontend frameworks.

Step 3: Enable HTTPS in your vite.js
Just like in the “CRA”-setup we need to make sure, that the environment is served under HTTPS. In the “CRA” world we needed to different files from the original ASP.NET Core & React template, but with vite.js there is a much simpler option available.
Execute the following command in the clientapp directory:
npm install --save-dev vite-plugin-mkcert
Then in your vite.config.ts use this config:
import { defineConfig } from 'vite'
import react from '@vitejs/plugin-react'
import mkcert from 'vite-plugin-mkcert'

// https://vitejs.dev/config/
export default defineConfig({
    base: '/app',
    server: {
        https: true,
        port: 6363
    },
    plugins: [react(), mkcert()],
})
Be aware: The base: '/app' will be used as a sub-path.
The important part for the HTTPS setting is that we use the mkcert() plugin and configure the server part with a port and set https to true.
Step 4: Add the Microsoft.AspNetCore.SpaServices.Extensions NuGet package
Same as in the other blogpost, we need to add the Microsoft.AspNetCore.SpaServices.Extensions NuGet package to glue the ASP.NET Core development and React world together. If you use .NET 7, then use the version 7.x.x, if you use .NET 6, use the version 6.x.x - etc.

Step 5: Enhance your Program.cs
Back to the Program.cs - this is more or less the same as with the “CRA” setup:
Add the SpaStaticFiles to the services collection like this in your Program.cs - be aware, that vite.js builds everything in a folder called dist:
var builder = WebApplication.CreateBuilder(args);

// Add services to the container.
builder.Services.AddControllersWithViews();

// ↓ Add the following lines: ↓
builder.Services.AddSpaStaticFiles(configuration => {
    configuration.RootPath = "clientapp/dist";
});
// ↑ these lines ↑

var app = builder.Build();
Now we need to use the SpaServices like this:
app.MapControllerRoute(
    name: "default",
    pattern: "{controller=Home}/{action=Index}/{id?}");

// ↓ Add the following lines: ↓
var spaPath = "/app";
if (app.Environment.IsDevelopment())
{
    app.MapWhen(y => y.Request.Path.StartsWithSegments(spaPath), client =>
    {
        client.UseSpa(spa =>
        {
            spa.UseProxyToSpaDevelopmentServer("https://localhost:6363");
        });
    });
}
else
{
    app.Map(new PathString(spaPath), client =>
    {
        client.UseSpaStaticFiles();
        client.UseSpa(spa => {
            spa.Options.SourcePath = "clientapp";

            // adds no-store header to index page to prevent deployment issues (prevent linking to old .js files)
            // .js and other static resources are still cached by the browser
            spa.Options.DefaultPageStaticFileOptions = new StaticFileOptions
            {
                OnPrepareResponse = ctx =>
                {
                    ResponseHeaders headers = ctx.Context.Response.GetTypedHeaders();
                    headers.CacheControl = new CacheControlHeaderValue
                    {
                        NoCache = true,
                        NoStore = true,
                        MustRevalidate = true
                    };
                }
            };
        });
    });
}
// ↑ these lines ↑

app.Run();
Just like in the original blogpost. In the development mode we use the UseProxyToSpaDevelopmentServer-method to proxy all requests to the vite.js dev server. In the real world, we will use the files from the dist folder.
Step 6: Invoke npm run build during publish
The last step is to complete the setup. We want to build the ASP.NET Core app and the React app, when we use dotnet publish:
Add this to your .csproj-file and it should work:
	<PropertyGroup>
		<SpaRoot>clientapp\</SpaRoot>
	</PropertyGroup>

	<Target Name="PublishRunWebpack" AfterTargets="ComputeFilesToPublish">
		<!-- As part of publishing, ensure the JS resources are freshly built in production mode -->
		<Exec WorkingDirectory="$(SpaRoot)" Command="npm install" />
		<Exec WorkingDirectory="$(SpaRoot)" Command="npm run build" />

		<!-- Include the newly-built files in the publish output -->
		<ItemGroup>
			<DistFiles Include="$(SpaRoot)dist\**" />  <!-- Changed to dist! -->
			<ResolvedFileToPublish Include="@(DistFiles->'%(FullPath)')" Exclude="@(ResolvedFileToPublish)">
				<RelativePath>%(DistFiles.Identity)</RelativePath> <!-- Changed! -->
				<CopyToPublishDirectory>PreserveNewest</CopyToPublishDirectory>
				<ExcludeFromSingleFile>true</ExcludeFromSingleFile>
			</ResolvedFileToPublish>
		</ItemGroup>
	</Target>
Result
You should now be able to use Visual Studio Code (or something like this) and start the frontend project with dev. If you open a browser and go to https://127.0.0.1:6363/app you should see something like this:

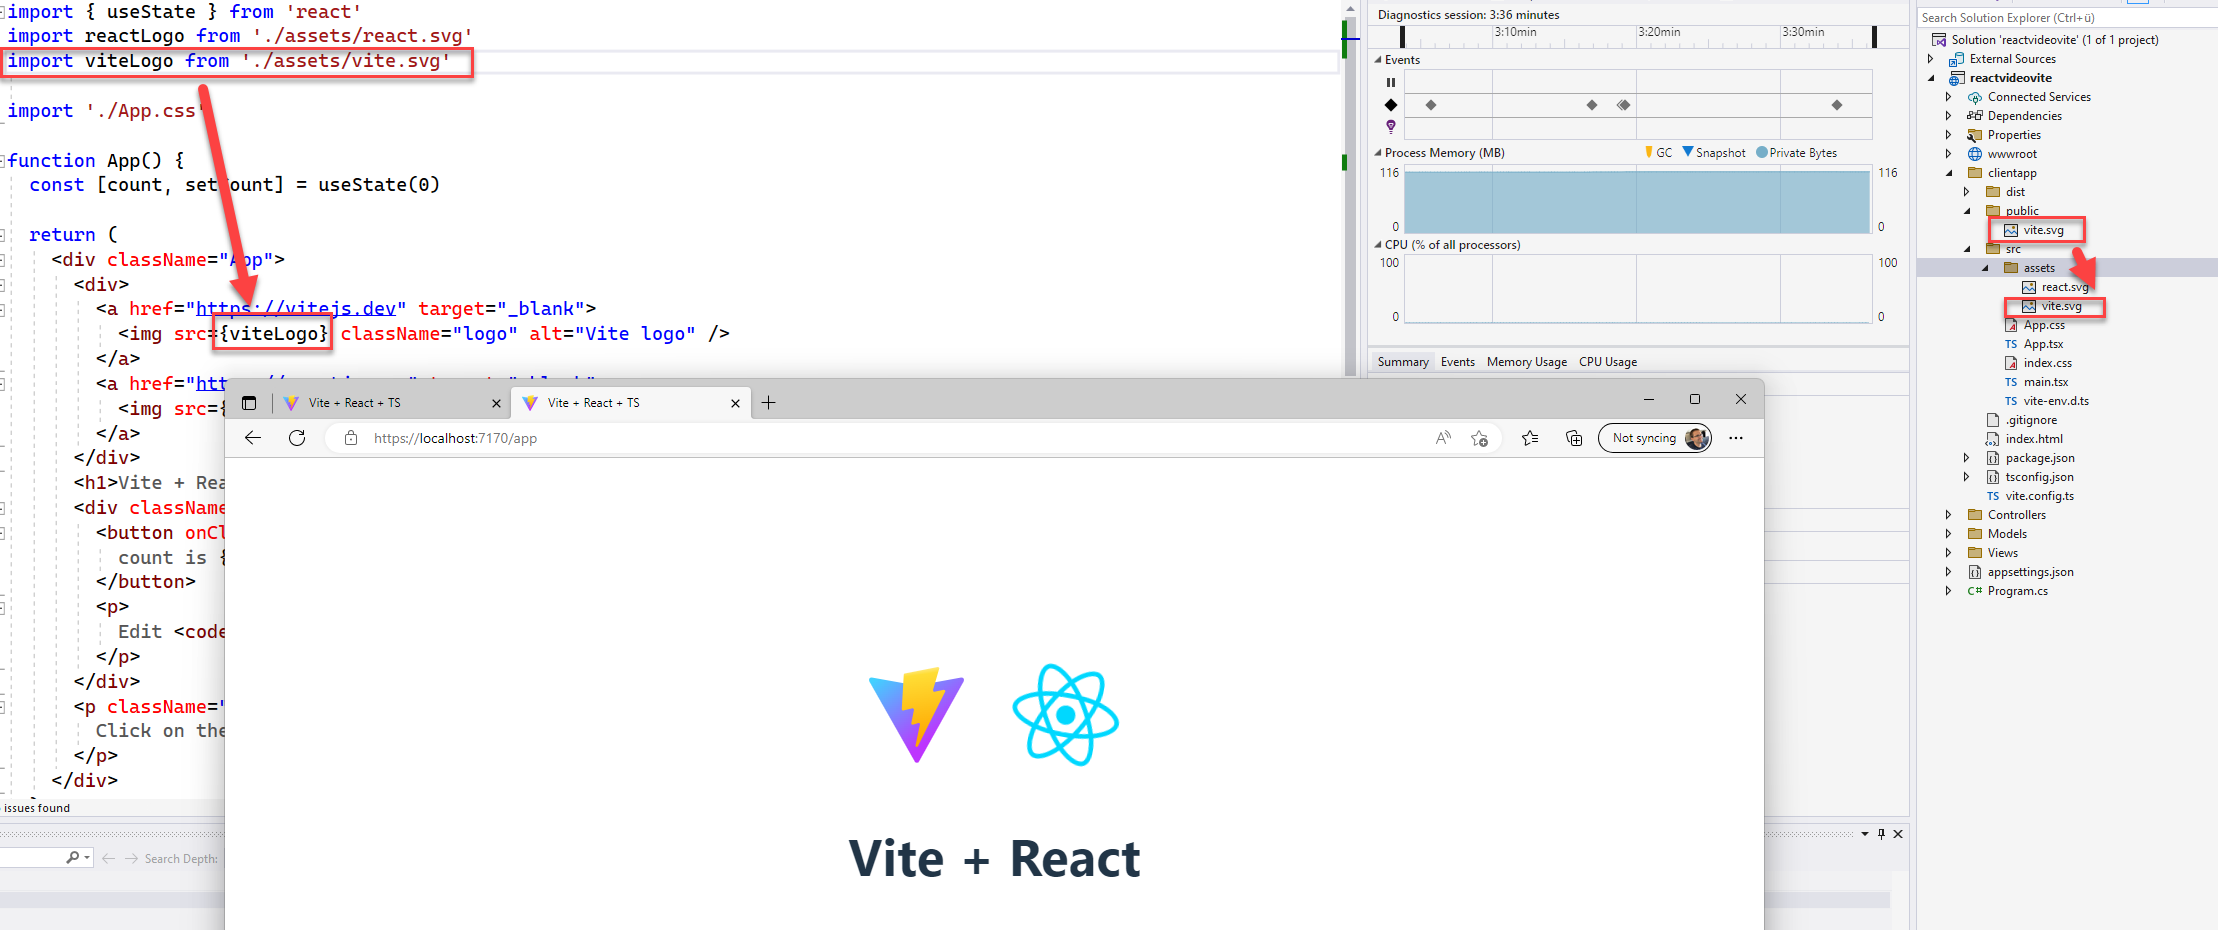
Now start the ASP.NET Core app and go to /app and it should look like this:

Ok - this looks broken, right? Well - this is a more or less a “known” problem, but can be easily avoided. If we import the logo from the assets it works as expected and shouldn’t be a general problem:

Code
The sample code can be found here.
Video
I made a video about this topic (in German, sorry :-/) as well - feel free to subscribe ;)
Hope this helps!