HTML und CSS sind für mich keine Fremdworte, jedoch muss ich mich geschlagen geben: Ich selbst bin kein Webdesigner – ich würde mich eher als Webentwickler betrachten. Eine schicke Seite ist aber ein muss. Zum Glück gibt es fertige “Systeme”
Twitter Bootstrap
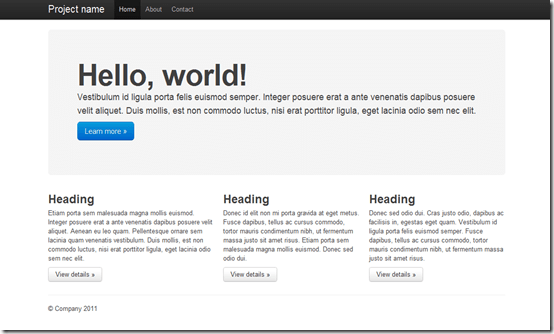
Twitter Bootstrap ist ein Toolkit für alle möglichen Arten von Webapplikationen. Es beinhaltet einige Basis Styles und spezielle Styles für Buttons, Tabellen, Formularen etc. Im Grunde ist es ein ausgefeiltes Grid-System. Im Gegensatz zu anderen CSS Grid Frameworks, wirkt Twitter Bootstrap auf den ersten Blick jedenfalls “runder” und bietet schon einige Standardelemente.
Am besten kann man sich alles online anschauen. Sourcen dazu findet man auf GitHub.
Technik dahinter
Twitter Bootstrap nutzt Less um das CSS zu erstellen und hat sogar für einige kleine UI Spielerein (Popups, Dropdowns, Dialoge…) fertige Javascripts
Die Einbindung
.Es müssen nur die Styles (entweder die LESS Datein + die LESS Javascript Datei oder die fertige CSS) eingebunden werden. Ein Beispiel, welches auch in den Examples auf GitHub zu finden ist:
<!DOCTYPE html>
<html lang="en">
<head>
<meta charset="utf-8">
<title>Bootstrap, from Twitter</title>
<meta name="description" content="">
<meta name="author" content="">
<!-- Le HTML5 shim, for IE6-8 support of HTML elements -->
<!--[if lt IE 9]>
<script src="http://html5shim.googlecode.com/svn/trunk/html5.js"></script>
<![endif]-->
<!-- Le styles -->
<link href="../bootstrap.css" rel="stylesheet">
<style type="text/css">
/* Override some defaults */
html, body {
background-color: #eee;
}
body {
padding-top: 40px; /* 40px to make the container go all the way to the bottom of the topbar */
}
.container > footer p {
text-align: center; /* center align it with the container */
}
.container {
width: 820px; /* downsize our container to make the content feel a bit tighter and more cohesive. NOTE: this removes two full columns from the grid, meaning you only go to 14 columns and not 16. */
}
/* The white background content wrapper */
.content {
background-color: #fff;
padding: 20px;
margin: 0 -20px; /* negative indent the amount of the padding to maintain the grid system */
-webkit-border-radius: 0 0 6px 6px;
-moz-border-radius: 0 0 6px 6px;
border-radius: 0 0 6px 6px;
-webkit-box-shadow: 0 1px 2px rgba(0,0,0,.15);
-moz-box-shadow: 0 1px 2px rgba(0,0,0,.15);
box-shadow: 0 1px 2px rgba(0,0,0,.15);
}
/* Page header tweaks */
.page-header {
background-color: #f5f5f5;
padding: 20px 20px 10px;
margin: -20px -20px 20px;
}
/* Styles you shouldn't keep as they are for displaying this base example only */
.content .span10,
.content .span4 {
min-height: 500px;
}
/* Give a quick and non-cross-browser friendly divider */
.content .span4 {
margin-left: 0;
padding-left: 19px;
border-left: 1px solid #eee;
}
.topbar .btn {
border: 0;
}
</style>
<!-- Le fav and touch icons -->
<link rel="shortcut icon" href="images/favicon.ico">
<link rel="apple-touch-icon" href="images/apple-touch-icon.png">
<link rel="apple-touch-icon" sizes="72x72" href="images/apple-touch-icon-72x72.png">
<link rel="apple-touch-icon" sizes="114x114" href="images/apple-touch-icon-114x114.png">
</head>
<body>
<div class="topbar">
<div class="fill">
<div class="container">
<a class="brand" href="#">Project name</a>
<ul class="nav">
<li class="active"><a href="#">Home</a></li>
<li><a href="#about">About</a></li>
<li><a href="#contact">Contact</a></li>
</ul>
<form action="" class="pull-right">
<input class="input-small" type="text" placeholder="Username">
<input class="input-small" type="password" placeholder="Password">
<button class="btn" type="submit">Sign in</button>
</form>
</div>
</div>
</div>
<div class="container">
<div class="content">
<div class="page-header">
<h1>Page name <small>Supporting text or tagline</small></h1>
</div>
<div class="row">
<div class="span10">
<h2>Main content</h2>
</div>
<div class="span4">
<h3>Secondary content</h3>
</div>
</div>
</div>
<footer>
<p>© Company 2011</p>
</footer>
</div> <!-- /container -->
</body>
</html>
Erzeugt diese Seite:
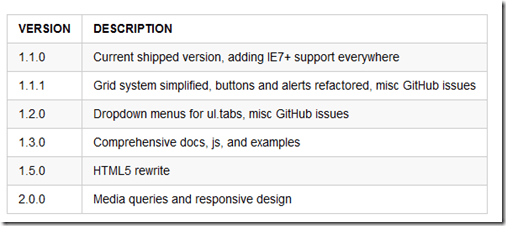
Roadmap
Es gibt auch eine Roadmap für das Projekt, welches aktiv von mehreren Entwicklern bei Twitter gepflegt wird:
Fazit
Twitter Bootstrap scheint für nicht-Designer ein solider Anfang zu sein, mit vielen netten Elementen. Das einzige was noch fehlt, wäre eine Variante für Mobile Webseiten – schauen wir mal.
Download und alles andere findet man auf GitHub.

