 During my last blogposts I´ve already talked about using TeamCity as a Buildserver. Because of we are using Windows Azure in our BizzBingo project the subject for today is how to create automatically new deploymnts on Azure - it´s easier than you might think
 ![]()
"Visual Studio Deployment" == Fail!
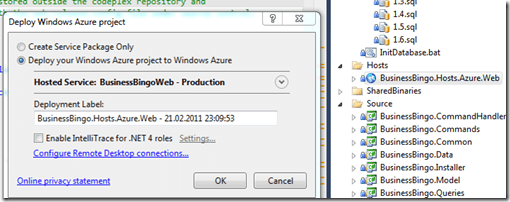
If you create a windows azure project Visual Studio offers you the opportunity to create a deployment:
T
hat´s nice for the first step of the developing process and I won´t miss it. But if you are developing software and try to build your Build- and Deploymentprocess only on your local Machine with Visual Studio should start to think about his profession ![]()
Architecture
It´s possible to have more than one developer working on a source control system like for example TFS or SVN or Git etc. A buildsystem, like TeamCity in my example, looks after the actuall Sources and build them in intervalls or whenever you nudge it manual. But because of BizzBingo is an open source I need to source out the sensitive information´s. After we finished building the project it will be deployed into the staging surroundings by Azure. After that the staging surroundings is "swapt" into the production surroundings to keep the processes going (at least no Downtime is the goal!)
Which part you want to run automatically is, of course, your own decision. Maybe you prefer to deploy just on the staging surroundings or directly on the production surroundings - doesn´t matter.
As an extra you are able to run test on the staging surroundings (Selenium, UI Tests and so on) and then something happens. But I´ve used the easier way because BizzBingo is just a hobby ![]()
Requirements
For the next step I assume you have an installed TeamCity ad a Code Repository (TFS/SVN etc.). TeamCity should be able in some way to take the sources. Of course, the usage of Teamcity is optional. It´s also possible to do it local or with another system (TFS Teambuild, classic MSBuild). For Windows Azure it´s necessary to have account information´s. Important Information´s:
- Servicename
- Subscription Key
Windows Azure Management Cmdlets for automation
Round about the management for Windows Azure Microsoft offers a REST surface. But in fact, it´s a bit exhausting to use the API directly. From Microsoft too (and maybe from other volunteers, it´s open source) there is an Azure Management Cmdlets available (Powershell!).
The following software should be installed:
- Newest Windows Azure SDK (1.3)
- Powershell (since Win7/WinServer2008 it´s included automatically)
Installation of Azure Management Cmdlets
It´s possible that there are some problems appearing during the installation. The installation routine is used to check the Azure SDK Version quite strict. After the last security update the version number has been increased. But it´s possible to adjust the check in this file:
C:\WASMCmdlets\setup\scripts\dependencies\check\CheckAzureSDK.ps1
Here are two lines with the exact SDK version:
$res1 = SearchUninstall -SearchFor 'Windows Azure SDK*' -SearchVersion '1.3.20121.1237' -UninstallKey 'HKLM:SOFTWARE\Wow6432Node\Microsoft\Windows\CurrentVersion\Uninstall\';
$res2 = SearchUninstall -SearchFor 'Windows Azure SDK*' -SearchVersion '1.3.20121.1237' -UninstallKey 'HKLM:SOFTWARE\Microsoft\Windows\CurrentVersion\Uninstall\';
With every security update the version number changes - for me, I entered the Version "1.3.20121.1237" manual. It works, at least for me and the installer runs successfully after that.
Management certificate
A quotation of David Aiken:
1. Load the IIS 7 management console. I´m assuming here you have IIS7 installed since its required for the Windows Azure SDK.
2. Click on your Server.
3. Double Click Server Certificates in the IIS Section in the main panel.
4. Click Create Self-Signed Certificate... in the Actions panel.
5. Give it a Friendly Name.
6. Close IIS Manager.
7. Open Certificate Manager (Start->Run->certmgr.msc)
8. Open Trusted Root Certification Authorities, then Certificates.
9. Look for your certificate (Tip: Look in the Friendly Name column).
10. Right Click your certificate, then choose All Tasks, then Export...
11. In the Wizard, choose No, do not export the private key, then choose the DER file format.
12. Give your cert a name. (remember to call it something.cer).
13. Navigate to the Windows Azure Portal - http://windows.azure.com
An other way to create the certificate "makecert":
makecert -r -pe -a sha1 -n "CN=Windows Azure Authentication Certificate" -ss My -len 2048 -sp "Microsoft Enhanced RSA and AES Cryptographic Provider" -sy 24 testcert.cer
In Windows the tool is located at: SDK: C:\Program Files (x86)\Microsoft SDKs\Windows\v7.0A\Bin
Doesn´t matter which way you choose - you need it from somewhere ![]()
Now you are able to add the certificate in "Management Certificates":

TeamCity Build
Now we talk about the Buildprocess. The most important step is to open MSBuild. The step I´ve made before isn´t important for the Azure Deployment.
In Detail:
In this step the MSBuild script should be opened and you will find it here:
%system.teamcity.build.checkoutDir%\Main\Build\CommonBuildSteps.targets
In TFS it´s here:
It´s also important to define the Working Directory to navigate in MSBuild.
Beware: MSBuild needs to be in the x64 mod if the server is a 63bit machine. It looks like the Azure Management Cmdlets are only installed in the 64bin mod.
Higher window: x86 - error
Lower window: x64 - everything alright

As target I call "PrepareAzureDeployment" and enter as properties my subscription key and the location of the certificate. But I only do so because BizzBingo is Open Source and because of that I can´t save the sensitive information´s into the file.
The parameter looks like that:
/p:AzureSubKey="83-SUB-KEY-9812" /p:AzureCertPath="cert:\LocalMachine\my\XXXXXXXXX"
"PrepareAzureDeployment" MsBuild Target
The main part of this is some log writings and a little "Dirty Hack" because I didn´t want to write sensitive information´s into the Web.Release.config ![]()
At the moment we read out the Web.Config for the data base access on BizzBingo. To keep the ConnectionString secret I copy a specific web.release.config file and overwrite the variant from TFS. Dirty Hack but it´s alright for me ![]()
First I´m going to show you the whole code and then I tell you how to go on:
  <Target Name="PrepareAzureDeployment">
    <Message Text="PrepareAzureDeployment called."/>

    <!-- For security reasons web.release.config will be stored outside the codeplex repository and
        I will override it here (of you run this local with the web.release.config file under source control:
        this might be fail) -->
    <Message Text="CertPath: $(AzureCertPath)" />
    <Message Text="Key: $(AzureSubKey)" />

    <Copy SourceFiles="C:\BizzBingoSecureContainer\Web.Release.config" DestinationFolder="$(MSBuildStartupDirectory)\..\Source\BusinessBingo\Source\BusinessBingo.Web\" />

    <MSBuild Projects="$(MSBuildStartupDirectory)\..\Source\BusinessBingo\Hosts\BusinessBingo.Hosts.Azure.Web\BusinessBingo.Hosts.Azure.Web.ccproj"
             Targets="CorePublish"
             Properties="Configuration=Release"/>

    <Message Text="Deploy To Staging on Azure" />

    <Exec Command="powershell .\Azure_DeployToStaging.ps1 -certPath '$(AzureCertPath)' -subKey '$(AzureSubKey)'" />
    <Message Text="Sleep for 400sec as a workaround" />
    <Sleep Seconds="400" />

    <Message Text="Swap To Production on Azure" />

    <Exec Command="powershell .\Azure_SwapToProduction.ps1 -certPath '$(AzureCertPath)' -subKey '$(AzureSubKey)'" />

  </Target>
To build the Azure package I call the fitting MSBuild Target in the Azue project. Here I navigate with the help of "$(MSBuildStartupDirectory)" (therefore the WorkingDirectory in TeamCity) and call "CorePublish" with the accordingly configurations.
    <MSBuild Projects="$(MSBuildStartupDirectory)\..\Source\BusinessBingo\Hosts\BusinessBingo.Hosts.Azure.Web\BusinessBingo.Hosts.Azure.Web.ccproj"
             Targets="CorePublish"
             Properties="Configuration=Release"/>
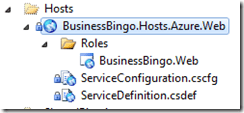
"BusinessBingo.Hosts.Azure.Web" is a normal azure project which has ASP.NET MVC App as WebRole:

With the call of "CorePublish" the BusinessBingo.Web project will be build, the Web.config transformation started and the azure package packed. You will find the result in the "bin\Release\Publish" folder of the azure project:
Deploy on azure staging
Now is in MSBuild the next step the call of the powershell script to deploy on azure. As parameters I add SubscriptionKey and Service Name:
    <Message Text="Deploy To Staging on Azure" />

    <Exec Command="powershell .\Azure_DeployToStaging.ps1 -certPath '$(AzureCertPath)' -subKey '$(AzureSubKey)'" />
Side note: Because of MSBuild runs in the x64 bit modus Powershell is used to be called in the same mode.
Otherwise the Azure cmdlets won´t be found!
Main parts of the powershell script are from the Windows Azure Guidance from the p&p team of Microsoft. More descriptions you will find here.
Azure_DeployToStaging.ps1
Now we are going to take a deeper view into the Powershell script. I needed to fix it a little bit so now it´s possible to enter sensitive information´s from outside as parameters but beside of this it´s easy to understand. (And you will see how sexy Powershell could be!)
Important Hint:
A typical error message was for me: "The HTTP request was forbidden with client authentication scheme "˜Anonymous´.". That means you´ve entered a wrong subscription key.
The certificate:
Like I´ve already written the certificate needs to be uploaded on azure too. That´s what it could look like without adding it as a parameter:
$cert = Get-Item cert:\CurrentUser\my\xxxxxxx
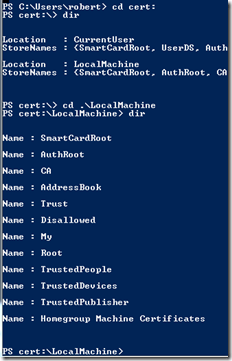
It´s possible to take a look on the certificate store in two ways:
- CertMgr.msc
- Enter with Powershell "cd cert:"

You can take a look on the certificate store nearly like on a file system. But my "xxx" information needs to be replaced with the Thumbprint:
Subscription Key
You will find the key in the Windows azure portal at the hosted services. I didn´t get to know till now if the key includes the number 0 or the letter O - it´s not possible to copy the key from the silverlight surface (thanks to RIA technology!) Maybe you fill found the key Billinginformation´s (ugly HTML but with copy/paste opptions ![]() )
)
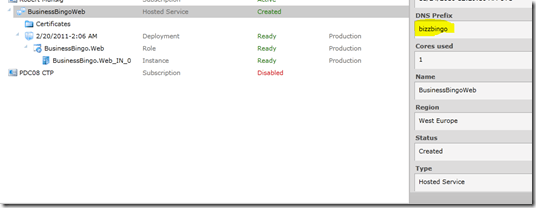
ServiceName
Even if the entry is called "Servicename" you need the DNS Name for that:

I think the name is case sensitive, so copy it as it´s written ![]()
To the main script
Param($certPath, $subKey)
# Secrets
$cert = Get-Item $certPath
$sub = $subKey
$servicename = "bizzbingo"

# Paths
$buildPath = "..\Source\BusinessBingo\Hosts\BusinessBingo.Hosts.Azure.Web\bin\Release\Publish\"
$packagename = "BusinessBingo.Hosts.Azure.Web.cspkg"
$serviceconfig = "ServiceConfiguration.cscfg"
$package = join-path $buildPath $packageName
$config = join-path $buildPath $serviceconfig

# Date
$a = Get-Date
$buildLabel = $a.ToShortDateString() + "-" + $a.ToShortTimeString()

# Install PS-SnapIn
if ((Get-PSSnapin | ?{$_.Name -eq "AzureManagementToolsSnapIn"}) -eq $null)
{
  Add-PSSnapin AzureManagementToolsSnapIn
}

# Get Staging
$hostedService = Get-HostedService $servicename -Certificate $cert -SubscriptionId $sub | Get-Deployment -Slot Staging

# Delete Staging if nessarary
if ($hostedService.Status -ne $null)
{
    $hostedService |
      Set-DeploymentStatus 'Suspended' |
      Get-OperationStatus -WaitToComplete
    $hostedService |
      Remove-Deployment |
      Get-OperationStatus -WaitToComplete
}

# Deploy on Staging
Get-HostedService $servicename -Certificate $cert -SubscriptionId $sub |
    New-Deployment Staging -package $package -configuration $config -label $buildLabel -serviceName $servicename |
    Get-OperationStatus -WaitToComplete

# Start on Staging
Get-HostedService $servicename -Certificate $cert -SubscriptionId $sub |
    Get-Deployment -Slot Staging |
    Set-DeploymentStatus 'Running' |
    Get-OperationStatus -WaitToComplete
In the MsBuild step we did before I´ve build the package and I´m able to navigate to this place. Now it´s checking up if there is something going on in the staging surroundings and if there is something, it will be stopped.
Now the deployment starts and the instances will be turned off. The addition "WaitToComplete" takes care that every action will wait till the last one is completed.
Dirty Workaround at the start of the instance
If I try to start the staging surrounding in line 44 the "WaitToComplete" event is done too quickly. During the initialisation it´s written as "ready". That´s a problem of course if I try to switch automatically from Staging to production. I don´t know if this is what they have planned or if it´s a bug. But I´m not alone with my problem ![]()
Here ones again the deployment steps which happen in the MSBuild script:
    <Exec Command="powershell .\Azure_DeployToStaging.ps1 -certPath '$(AzureCertPath)' -subKey '$(AzureSubKey)'" />

	<Message Text="Sleep for 400sec as a workaround" />
    <Sleep Seconds="400" />

    <Message Text="Swap To Production on Azure" />
    <Exec Command="powershell .\Azure_SwapToProduction.ps1 -certPath '$(AzureCertPath)' -subKey '$(AzureSubKey)'" />
In Line 1 the built package will be deployed on the staging surrounding. Now the workaround starts: To switch from "Staging" to "Production" the staging needs to be booted up completely because otherwise you will have an ugly downtime on the "Production". So I wait for 400 seconds. That´s the time the azure project needs to initialize and start. The task is from the MSBuild community task project. Now the started staging surroundings will be "swapt" to the production.
Azure staging swap to production
Same game at the beginning: took Key/certificate and check Snapln. Now it took the deployment on the staging and makes a "Move-deployment" and it makes a "Swap" like in the webfrontend.
After that I should down the staging surrounding and delete it because it produces costs.
Param($certPath, $subKey)
# Secrets
$cert = Get-Item $certPath
$sub = $subKey
$servicename = "bizzbingo"

# Install PS-SnapIn
if ((Get-PSSnapin | ?{$_.Name -eq "AzureManagementToolsSnapIn"}) -eq $null)
{
  Add-PSSnapin AzureManagementToolsSnapIn
}

# Switch staging <-> production
Get-Deployment staging -subscriptionId $sub -certificate $cert -serviceName $servicename |
		Move-Deployment |
		Get-OperationStatus -WaitToComplete

# Stop in staging
Get-HostedService $servicename -Certificate $cert -SubscriptionId $sub |
    Get-Deployment -Slot 'Staging' |
    Set-DeploymentStatus 'Suspended' |
    Get-OperationStatus -WaitToComplete

# Remove from staging
Get-HostedService $servicename -Certificate $cert -SubscriptionId $sub |
    Get-Deployment -Slot 'Staging' |
    Remove-Deployment |
    Get-OperationStatus -WaitToComplete
That´s it
The process may look a bit difficult but it isn´t with the Cmdlets I´ve showed you. The main barrier for me was the problem with the error message of the Azure Cmdlets.
Tl;dr
To say it short:
- SDK, install Cmdlets
- Windows Azure project + Azure account
- Generate and upload the management key
- Call windows azure project via MSBuild with "CorePublish"
- Built package via powershell on staging
- Wait a little bit - maybe buggy?
- Switsch from staging to production
The Code is on Codeplex and the webpage is available on www.BizzBingo.com.


