 Because I'm using NUnit instead of MSTest in my actual project I want to run the NUnit Tests in my build as well. If you want to find out how to compare MSTest with MSBuild click here. It's not that more difficult with NUnit.
Assumption
At the moment I work with NUnit Version 2.5.9 (actually in development). In Version 2.5.8 exists a bug which makes you unable to close the NUnit Agent. Probably the problem belongs to .NET 4.0 so please try to get the newest version.
After the installation you will find the Nunit file here:
C:\Program Files (x86)\NUnit 2.5.9
copy NUnit 2.5.9 /Runner /Files into the project directory
One possibility is to replace the NUnit Test Runner (in this case the nunit-console.exe) with a system path or another way is to copy all the files into the project directory.
Everything beneath "C:\Program Files (x86)\NUnit 2.5.9\bin\net-2.0" should be saved in the project directory or beneath.
I saved the file here: "PROJEKTNAME\Tools\NUnit\"
MsBuild Community Pack
Like in some other MSBuild blogposts I´ve used the MSBuild Community Pack because there is a nice "NUnit" task included.
Demo solution
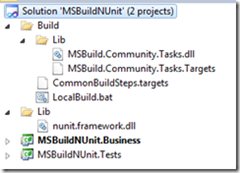
Exapt the NUnit Test Runner files you see everything thats important at the picture on the left. In Build\Lib you will find the MSBuild Community Pack and we also have a .bat file for easier achievement and of course our MsBuild file. The "MSBuildNUnit. Tests project is my "Demo" test project. Here is the link for the nunit.framework situated and one test.
The MSBuild File
<?xml version="1.0" encoding="utf-8"?>
<Project xmlns="http://schemas.microsoft.com/developer/msbuild/2003" DefaultTargets="Run">
<Import Project="$(MSBuildStartupDirectory)\Lib\MSBuild.Community.Tasks.Targets"/>
	<PropertyGroup>
    <!-- After Compile: Result will be saved in OutDir -->
		<OutDir>$(MSBuildStartupDirectory)\OutDir\</OutDir>

    <!-- Configuration -->
    <Configuration>Release</Configuration>

    <!-- Solutionproperties-->
		<SolutionProperties>
      OutDir=$(OutDir);
      Platform=Any CPU;
      Configuration=$(Configuration)
    </SolutionProperties>
	</PropertyGroup>
	<ItemGroup>
		<Solution Include="..\MSBuildNUnit.sln">
			<Properties>
				$(SolutionProperties)
			</Properties>
		</Solution>
	</ItemGroup>
	<Target Name="Run">
    <Message Text="Run called." />

    <CallTarget Targets="BuildSolution" />
    <CallTarget Targets="RunTests" />
  </Target>

  <Target Name="BuildSolution">
    <Message Text="BuildSolution called." />
    <MSBuild Projects="@(Solution)"/>
	</Target>

  <Target Name="RunTests">
    <!-- Run Unit tests -->
    <CreateItem Include="$(OutDir)*.Tests.dll">
      <Output TaskParameter="Include" ItemName="TestAssembly" />
    </CreateItem>
    <NUnit ToolPath="..\Tools\NUnit" DisableShadowCopy="true" Assemblies="@(TestAssembly)" />
  </Target>

</Project>
Between Line 32 and 43 you can see the NUnit integration. In OutDir I pick up all assemblies including a "test" and call them with the NUnit Task. I also need to define the ToolPath for the runner because otherwise the script won't find the runner.
As result we have a TestResults.xml at the end of the build in the build directory.
All in all: A good and easy thing.
