 I´ve already blogged about how to use StyleCop in an MSBuild Script. Today I´m going to show you how to create a StyleCop Settings file and apply them in every build with visual studio. Here is an easy solution.
Point of origin
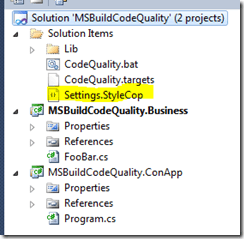
As point of origin we take the solution from the last blogpost. The stylecop file is already situated outside of the project.
Hint: To create a "default-stylecop" file just install Stylecop and click right on a project and after that click "run stylecop". After that a Settings.Stylecop file will be created into the project directory.

Link the StyleCop file
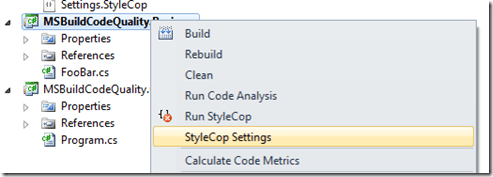
Click right on a project and StyleCop settings and you will be able to link a StyleCop file:

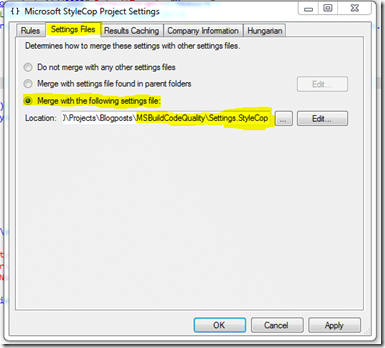
Here it´s possible to link our Settings.Stylecop:

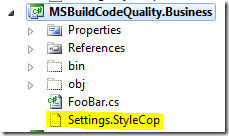
If you done with this a file will be created in the project directory but it won´t be referenced into the project. So click on "Show all files" and copy the file into the project:

That´s the content of the file:
<StyleCopSettings Version="4.3">
  <GlobalSettings>
    <StringProperty Name="LinkedSettingsFile">..\Settings.StyleCop</StringProperty>
    <StringProperty Name="MergeSettingsFiles">Linked</StringProperty>
  </GlobalSettings>
</StyleCopSettings>
Repeat this in every project....
And now, to activate the StyleCop while building: edit project files
To check the code after every building process you need to edit the project file. The StyleCop Target should be added.
If you, like in my example, copy all Stylecop files from the installation directory into the solution, it will work for all project members, doesn´t matter if they installed Stylecop or not.
The StyleCop file could be founded here (if you did not deselect the MSBuild files during the installation):
C:\Program Files (x86)\MSBuild\Microsoft\StyleCop\v4.4
I copied the whole folder into the solution directory.
Now adjust the csproj file:
<?xml version="1.0" encoding="utf-8"?>
<Project ToolsVersion="4.0" DefaultTargets="Build" xmlns="http://schemas.microsoft.com/developer/msbuild/2003">
  ...
  <Import Project="$(MSBuildToolsPath)\Microsoft.CSharp.targets" />
  <Import Project="..\Lib\Microsoft.StyleCop.targets"/>
  ...
</Project>
The second import statement is responsible for the activation of StyleCop. Also the position is important. After I wrote the import statement into the first line, there was no result visible.
After the import of the target file in every project it´s done.
This course of action is from the StyleCop teamblog:
- Setting Up StyleCop MSBuild Integration
- Sharing StyleCop Settings Across Projects
If you want the StyleCop results to appear as Error instead of Warning than you need to define this in the csproj file. Therefore enter this parameter in the several Build Konfiguration:
<StyleCopTreatErrorsAsWarnings>false</StyleCopTreatErrorsAsWarnings>
Result:
It may be helpful to integrate StyleCop into your projects. But depending on the needs of every project you need to decide which rules are helpful. The rules are easy to manage with a central StyleCop file and it will be helpful after initiation of the project / solution because you will be reminded after every build - doesn´t matter from MSBuild or via Visual Studio.