Project Centennial - running desktop apps in the UWP world
Last year Microsoft revealed the plans to run and distribute desktop apps (basically all apps ever written for Windows) in the Universal-Windows-Platform “universe”. The project titel was “Project Centennial” and a year later the tooling seems to be ok-ish. So, let’s try something simple and convert a simple WPF app to UWP.
Limitations with this approach
Be aware that even if you can “convert” your WPF app this way you will get a UWP-ish app. The executable will only run on a normal Windows Desktop System. The app will not work on a Windows Phone, Xbox or HoloLens - at least not now.
Also keep in mind that certain operations might fail and that the outcome of some operations might suprise you. The app itself will run in a kind of sandbox. Calls to the file system or registry will be faked. Details can be found here.
As far as I know from a couple of hours playing around:
- Changes to the Registry will not leak out of the sandbox, but for the app it will be seen as ok and is persistent
- Changes to Well-Known-Folders (e.g. %AppData%) will not leak out of the sandbox, but for the app it will be seen as ok and is persistent
- Some operation can leak out to the actual desktop, e.g. start another programm.
The Desktop App Converter
If you have an existing installer or setup you might want to take a look at the [desktop app converter](https://msdn.microsoft.com/en-us/windows/uwp/porting/desktop-to-uwp-run-desktop-app-converter. This utility will convert the installer to a UWP package.
A quick walk through can be found on Mike Taultys blog.
Step by Step - from WPF source to UWP app
The important steps from the WPF app to a UWP app are also documented in the MSDN.
But let’s start with a simple WPF app (running on .NET 4.6.1) - this is the MainWindow.xaml
<Window x:Class="WpfToUwpTestApp.MainWindow"
        xmlns="http://schemas.microsoft.com/winfx/2006/xaml/presentation"
        xmlns:x="http://schemas.microsoft.com/winfx/2006/xaml"
        xmlns:d="http://schemas.microsoft.com/expression/blend/2008"
        xmlns:mc="http://schemas.openxmlformats.org/markup-compatibility/2006"
        xmlns:local="clr-namespace:WpfToUwpTestApp"
        mc:Ignorable="d"
        Title="MainWindow - WpfToUwpTestApp" Height="350" Width="525">
    <StackPanel>
        <Button Height="100" Width="100" Click="Button_Click1">Write in Registry</Button>
        <Button Height="100" Width="100" Click="Button_Click2">Write in AppData</Button>
        <Button Height="100" Width="100" Click="Button_Click3">Open HTTP Address</Button>

    </StackPanel>
</Window>
The code behind:
public partial class MainWindow : Window
{
    public MainWindow()
    {
        InitializeComponent();
    }

    private void Button_Click1(object sender, RoutedEventArgs e)
    {
        RegistryKey key = Registry.CurrentUser.OpenSubKey("Software", true);

        key.CreateSubKey("WpfToUwpTestApp");
        key = key.OpenSubKey("WpfToUwpTestApp", true);


        key.CreateSubKey("ItWorks");
        key = key.OpenSubKey("ItWorks", true);

        key.SetValue("ItWorks", "true");
    }

    private void Button_Click2(object sender, RoutedEventArgs e)
    {
        string roaming = Environment.GetFolderPath(Environment.SpecialFolder.ApplicationData);

        string appFolder = System.IO.Path.Combine(roaming, "WpfToUwpTestApp");

        string file = System.IO.Path.Combine(appFolder, "Test.txt");

        if (Directory.Exists(appFolder) == false)
        {
            Directory.CreateDirectory(appFolder);
        }

        File.WriteAllText(file, "Hello World!");
    }

    private void Button_Click3(object sender, RoutedEventArgs e)
    {
        Process.Start("http://www.google.com");
    }
}
Pretty simple, right? Those three operations came just to my mind. In general I wouldn’t use the Registry at all, but I had a use case in mind where I need to access the Registry.
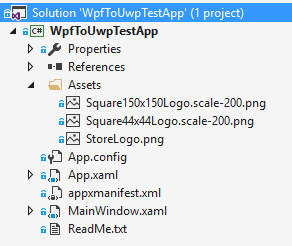
I also added a couple of dummy store images (from the default UWP app project template) - my solution looks like this:

When we build the .csproj the output should look like this:
- WpfToUwpTestApp.exe
- appxmanifest.xml
- Assets/StoreLogo.png
- Assets/Square150x150Logo.scale-200.png
- Assets/Square44x44Logo.scale-200.png
The appmanifest.xml
The next step is to create the appmanifest.xml - on the MSDN there is a handy template. The Desktop App Converter does the same thing and tries to create this file automatically, but it’s not that hard to set it by hand:
<?xml version="1.0" encoding="utf-8"?>
<Package
   xmlns="http://schemas.microsoft.com/appx/manifest/foundation/windows10"
   xmlns:uap="http://schemas.microsoft.com/appx/manifest/uap/windows10"
   xmlns:rescap="http://schemas.microsoft.com/appx/manifest/foundation/windows10/restrictedcapabilities">
  <Identity Name="WpfToUwpTestApp"
    ProcessorArchitecture="x64"
    Publisher="CN=Robert"
    Version="1.0.0.0" />
  <Properties>
    <DisplayName>WpfToUwpTestApp</DisplayName>
    <PublisherDisplayName>Robert</PublisherDisplayName>
    <Description>No description entered</Description>
    <Logo>Assets/StoreLogo.png</Logo>
  </Properties>
  <Resources>
    <Resource Language="en-us" />
  </Resources>
  <Dependencies>
    <TargetDeviceFamily Name="Windows.Desktop" MinVersion="10.0.14316.0" MaxVersionTested="10.0.14316.0" />
  </Dependencies>
  <Capabilities>
    <rescap:Capability Name="runFullTrust"/>
  </Capabilities>
  <Applications>
    <Application Id="Test" Executable="WpfToUwpTestApp.exe" EntryPoint="Windows.FullTrustApplication">
      <uap:VisualElements
       BackgroundColor="#464646"
       DisplayName="WpfToUwpTestApp"
       Square150x150Logo="Assets/Square150x150Logo.scale-200.png"
       Square44x44Logo="Assets/Square44x44Logo.scale-200.png"
       Description="WpfUwpWriteInRegistry - Desc" />
    </Application>
  </Applications>
</Package>
Create the App.appx package
Now we are ready to create the appx package. You need the Windows 10 SDK to do this.
To simplify things, I copied the needed files from the build output to a folder called _App.
To create the package, invoke the following command:
"C:\Program Files (x86)\Windows Kits\10\bin\x64\makeappx.exe" pack -d "%~dp0_App" -p "%~dp0App.appx"
The result is a unsigned appx package called “App”.
Create a valid pfx (one time only)
In the following step we need a valid pfx to sign the package. For development you can use this command to create a pfx:
"C:\Program Files (x86)\Windows Kits\10\bin\x64\makecert.exe" -r -h 0 -n "CN=Robert" -eku 1.3.6.1.5.5.7.3.3 -pe -sv App.pvk App.cer

"C:\Program Files (x86)\Windows Kits\10\bin\x64\pvk2pfx.exe" -pvk App.pvk -spc App.cer -pfx App.pfx -po apptest
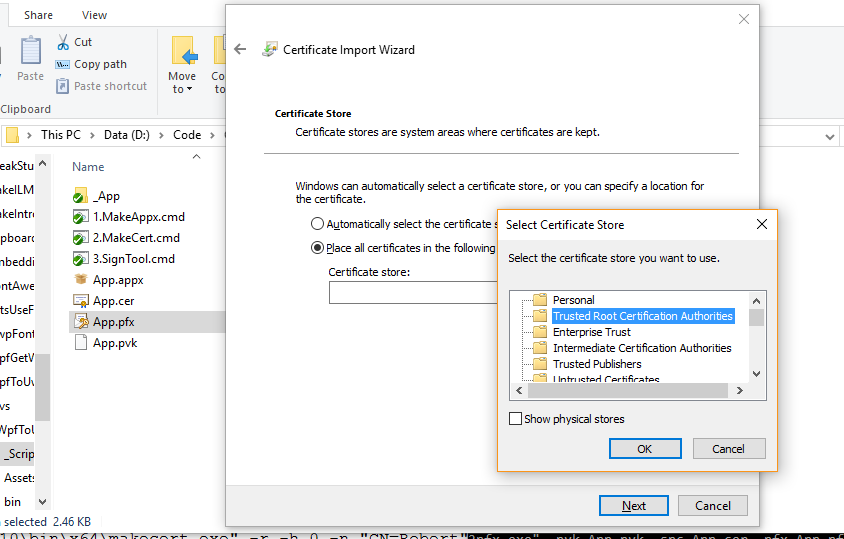
After this you should see a “App.pfx” in the folder. I’m not 100% sure if this step is really needed, but I needed to do it, otherwise I couldn’t install the app:
Now click on the pfx and enter the password “apptest” and import it in the “Trusted Root CAs”:

Sign App.appx
Now we need to sign the package and we are done:
"C:\Program Files (x86)\Windows Kits\10\bin\x64\signtool.exe" sign /f "App.pfx" -fd SHA256 /p apptest "App.appx"
Install the App!
Now you can double click on the appx package and the installer will show up:

Running the App
And there is our beauty:

Exploring the sandbox:
Remember our 3 methods? The results of those three calls are:
- Write to the Registry: Seems to work for the app, but (as expected) the registry value will not leak out of the “sandbox”
- Write to %appdata%: Seems to work for the app, but the data value will not leak out of the “sandbox”
- Open a browser: The default browser will be invoked for a HTTP url.
It was my first try to convert a (simple) WPF app to UWP and the result is interesting.
Hope my first steps in this world might help you!
The code and a handy readme.txt is available on GitHub.
From the comments: Fun with registy.dat files:
James Hancock/John Galt discovered a nice registy trick. His goal was to “fake” a given registry key, so that the converted UWP app can see a “virtual” registry key. This can be done with a file named “registry.dat”.
The registry.dat seems to be the source and target of all write actions inside the app:
“The virtual registery is always the registry.dat. if you don’t provide a default version then one is created on first use for you.
But if you do, then yes you can deploy whatever entries you want as a starting point for your app otherwise the starting point is whatever that computer currently has in the real registry.”
You can create such registry.dat files via RegEdit & export it as registry hive. Be aware, that my test run wasn’t successful, but I hope to get working sample. Until that I hope James comments will be helpful.